
 |
MicroSoft
Teacher Academy OneNote
|
As part of the program, you the teacher are expected to reflect and share your journey. As I also focused on using the Microsoft product OneNote, I used that for planning and reflections. In my blog reflections on the 1-to-1 program using OneNote, I record my setting up and using OneNote as a learning management system.
Having a focus for yourself as a learner and for your students will help you from being overwhelmed. My focus was using OneNote in the classroom and developing student agency. However as much as I enjoyed learning about and using OneNote, I would suggest teachers focus on using more familiar programs like the Microsoft suite for this limited time. Our first two weeks involved many technical difficulties, mainly because we were the first class to use them, but also because OneNote was a 'new' software for all involved.
OneNote is a wonderful piece of software that incorporates digital work-spaces, workbooks, pages, sections or folders, private and shared all in one. I particularly found this compactness to be one of my favourite features. I did all my planning there, anecdotal notes, shared timetables, readings and activities. Groups collaborated on shared pages, or worked on their own private OneNote, which I could see with a click of a tab. Plus I had OneNote almost constantly projected on my whiteboard as our guide and teaching space. My first OneNote Tour was made in week 2. Below under Screencasts, you can find links to my OneNote screencasts.
Some positives about OneNote: easy to share pages or collaborate on a page, being able to draw as well as type on any page, picture or PDF, the ease of a whole class document management, ability to make students more accountable (see all their folders, mark their work, proved tick boxes for activities), everything in one space, abilty to add video and voice recordings to pages (I used this for feedback and students used it for learning activities).
Some positives about OneNote: easy to share pages or collaborate on a page, being able to draw as well as type on any page, picture or PDF, the ease of a whole class document management, ability to make students more accountable (see all their folders, mark their work, proved tick boxes for activities), everything in one space, abilty to add video and voice recordings to pages (I used this for feedback and students used it for learning activities).


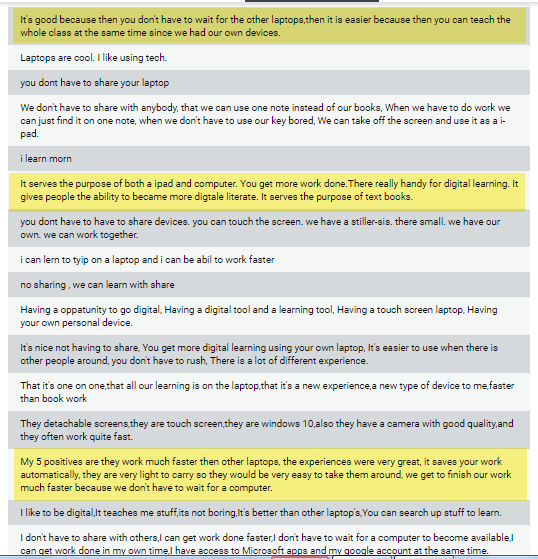
* Images are from the student voice reflection survey.
Some negatives about OneNote: one of the potentially best features of OneNote, the Learning Tool never work for us. Learning Tools is an add-in to include in your teacher OneNote. It converts PDF's and images into
text using optical character recognition (ocr), plus will read the text and
help the student identify nouns, verbs, and adjectives to aid comprehension.
Also, students can dictate voice messages (reading / summary / comprehension
questions etc.) on the page; wow! Check out my quick screencast on OneNote Learning Tools.
Another awesome tool is the Clipping Tool which clips screencaptures and will add it to the page you specify with a hyperlink 'credit'; again it didn't work for my students so we used Windows Snipping tool. In OneNote you can share and collaborate on any page you specify, or anyone can work together in the Collaboration Space; however we found the syncing was too slow and not consistent across the class, so we used Google Docs or Padlet for real time collaboration.


The HP laptops are quite small at first impression, but the kids loved them. They enjoyed that they could use them as a laptop or a pad, as the screen was detachable. Of course having their own personal device that they didn't need to share seemed to increase their enthusiasm for research and getting their work done. Because it was a limited time period we did almost all our learning digitally! Exhausting and not practical! I would kill to have a permanent 1-to-1 device classroom, but have realized balance with paper, whiteboards, materials etc. is essential to cater to all learners and for the teachers sanity.


Some negatives about the laptops were that some keyboards would fail. Windows updating at the most inconvenient times, and the styluses were either flat or not used much (very much to my surprise!).


Some negatives about the laptops were that some keyboards would fail. Windows updating at the most inconvenient times, and the styluses were either flat or not used much (very much to my surprise!).

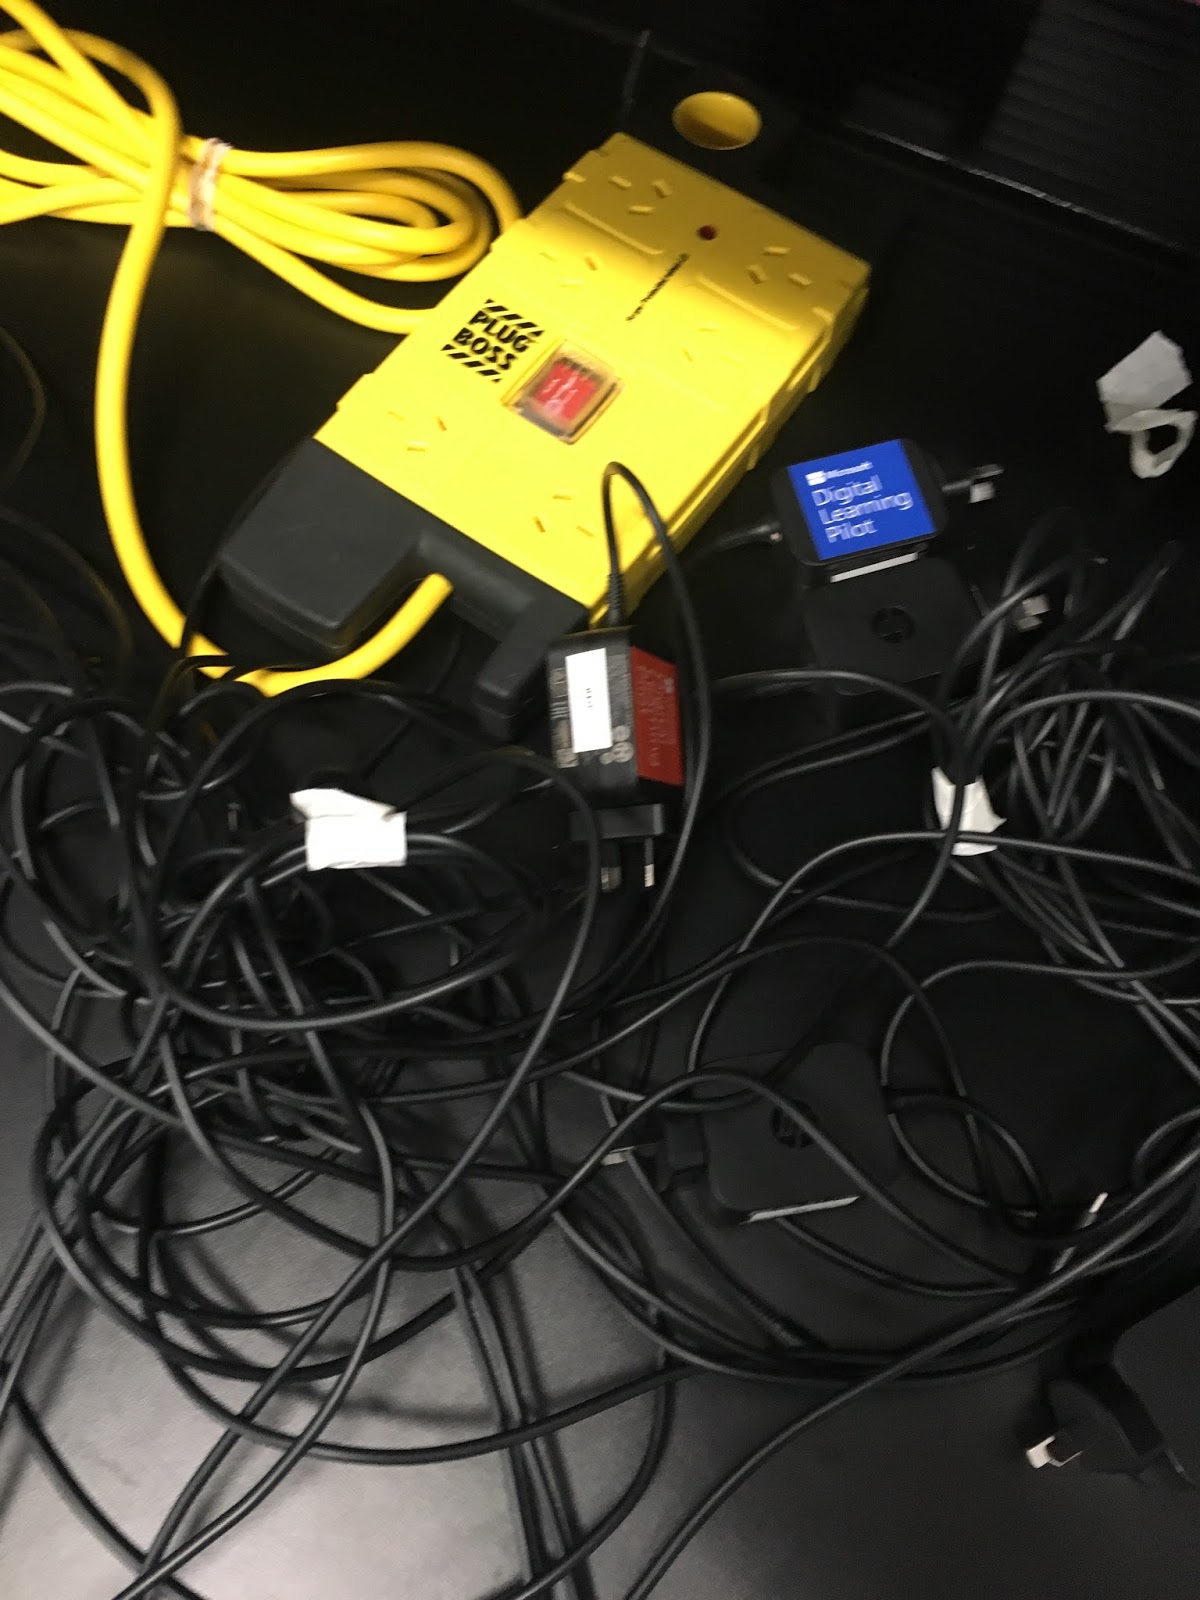
When preparing for your 1-to-1 laptop program, you will need to consider some setup tips. Ensure all the laptops are fully powered and updated, and all keyboards and styluses are working. Also ensure all programs you intend to use are fully loaded. If using OneNote that means setting up Class OneNote and Learning Tools, and especially ensuring the OneNote 2016 downloaded version is on each laptop, as the web versions don't incorporate the drawing and learning tools. These laptops need to be well charged or they just stop working until charged enough, so setting up a charging station and system are essential from day one. The power station can get messy and unsafe very quickly, the photo below is just two days after a tidy up! My students checked their battery life every break, if below 50% they placed them at the power station and the I.C.T. team plugged them in. As the students know they won't be able to work without power they are very good at doing this job.
Students quickly became the experts. Our word of the week was RECIPROCITY, which we used often to celebrate the fact that student peers were the real experts. Although my I.C.T. team started as experts, by the end of week 1 most of the class was an expert at some aspect. In the last week I surveyed my students using a Google Form. Their reflections on the HP laptops and OneNote are in this blog post, but the full survey is this spreadsheet version of the results.
Now we are back to a few devices to share and paper and pen. Yes, in many ways we are please to be back to using paper and pen, but in context this is because we did EVERYTHING digitally because we wanted to make the most of the 1-to-1 laptop opportunity. I and my students would still love to have 1-to-1 devices all year round, but I have learnt that like any learning, it needs to be a mixture of digital, paper, practical; integrating and supporting each other, which caters for all learners as well as growing digitally literate digital citizens.
Below are some supporting screencasts, tips and resources I used during this program. I hope this post will inspire you to try 1-to-1 and share your experiences with us.
Screencasts
- This is a screencast to show you how much difference the Class Notebook add-in makes to OneNote. Looking inside OneNote Class Notebook
- Looking at the Learning Tools add-in. OneNote Learning Tools
- How to group students in OneNote. OneNote Grouping Students
- A tour of my OneNote Class Notebook in the beginning. OneNote Tour
Tips & Tricks
- If you draw on an image do not move or resize it as the drawings don't scale, they seem to be independent objects.
- If the software finds a page conflict, it creates a backup highlighting the differences; handy.
- If you hit tab you get a table.
- To resize an image, click on it and choose the bottom right corner handle; it is the only one that keeps the proportions.
- When you copy a hyperlinked text into OneNote, it automatically pastes a website citing link.
- Images won't act as hyperlinks (even though they have a link attached) if in a Section other than Collaboration Space (requires Control + click) and Content Library (requires a single click). Although text hyperlinks seem to work throughout.
Resources
Below are some of my
learning resources that have helped me so far:


